> ## Documentation Index
> Fetch the complete documentation index at: https://help.henshu.io/llms.txt
> Use this file to discover all available pages before exploring further.
# Cut & trim audio
> How to make cuts and mutes in Henshu using the waveform or transcript, and how to preview your episode.
Once your audio is uploaded and organized into blocks, you can make edits within each block. Henshu gives you two ways to do this: selecting regions on the waveform, or selecting words in a transcript. Both stay in sync.
## Entering edit mode
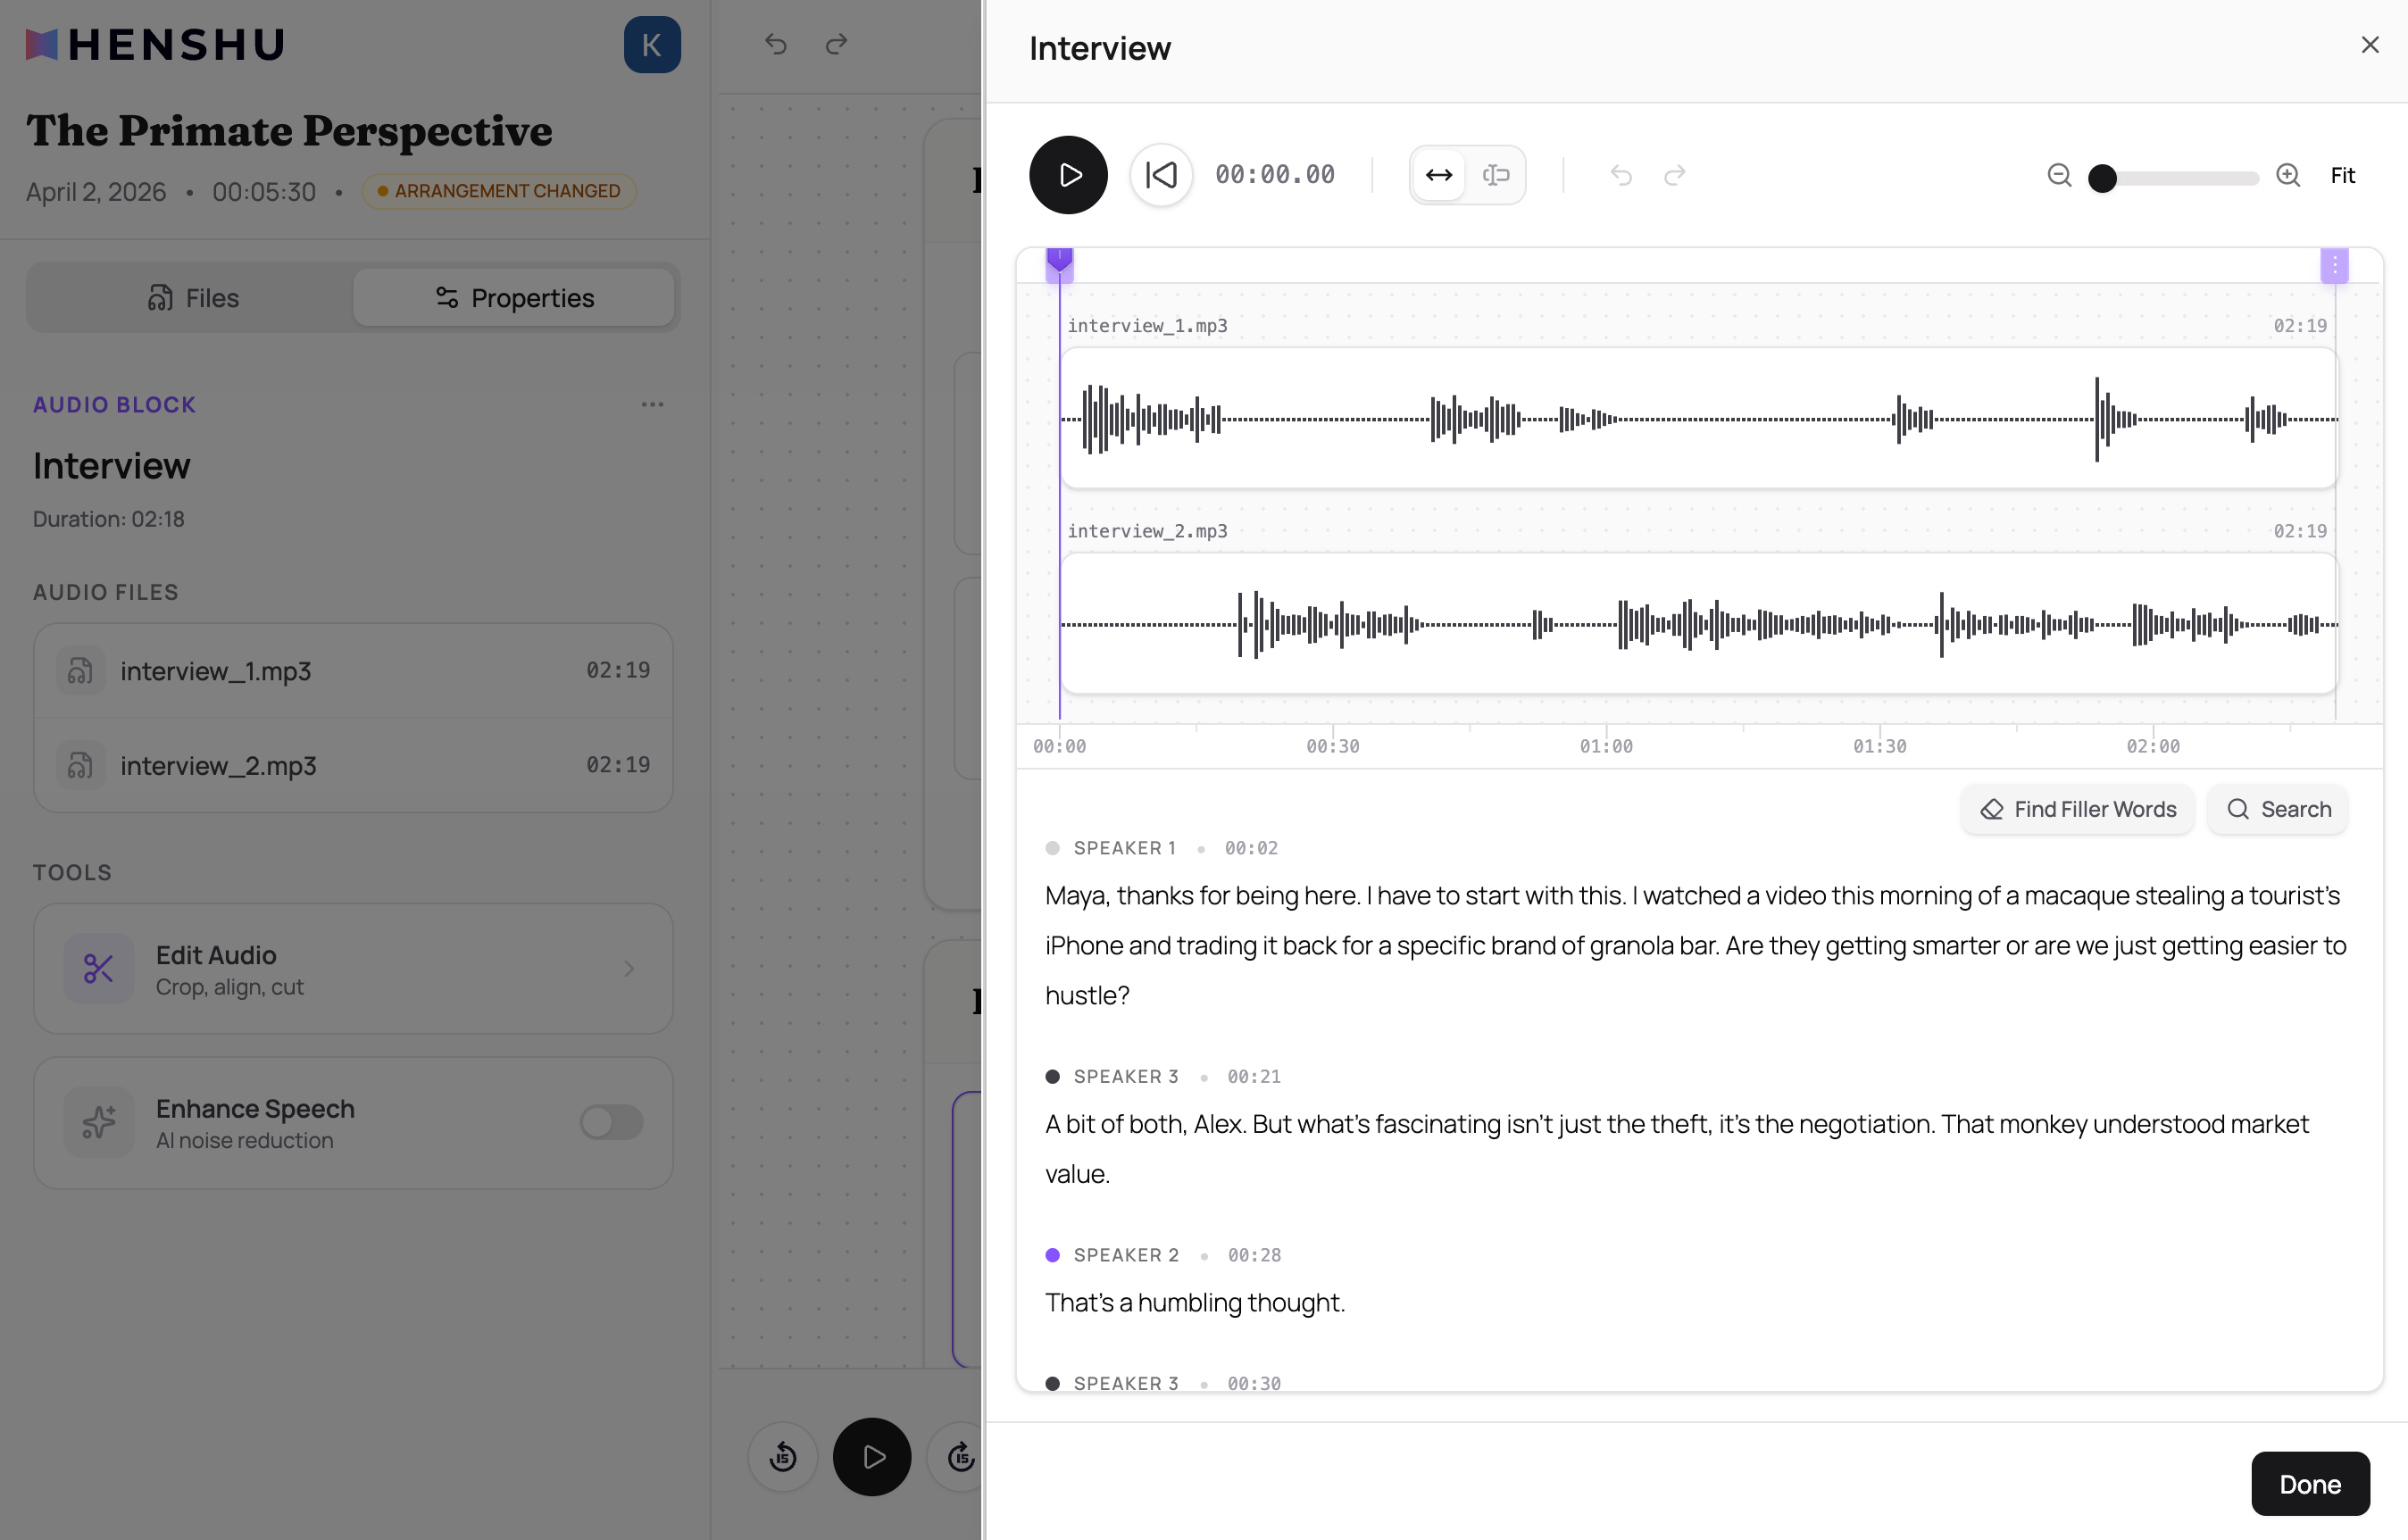
To edit an audio block, double-click on its card in the editor. This opens the detail view where you can trim, cut, mute, and work with the transcript. You can also click **Edit Audio** in the **Properties** panel.
 ## Trimming the start and end
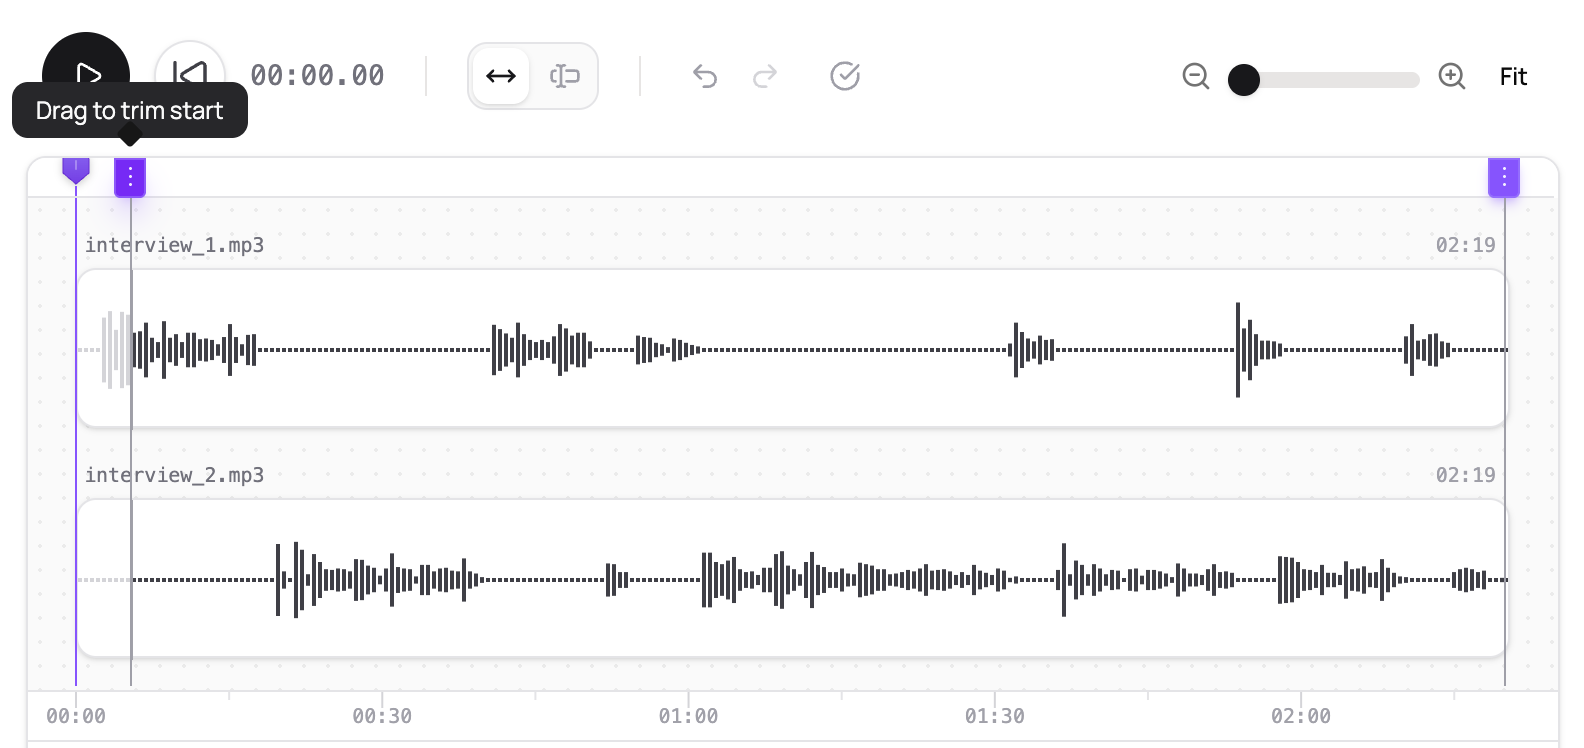
When you open an audio block's detail view, you'll see purple grab handles at the start and end of the waveform. Drag these to trim off the beginning or end of the recording. This is the quickest way to remove dead air or countdowns from the start, or trailing silence at the end.
## Trimming the start and end
When you open an audio block's detail view, you'll see purple grab handles at the start and end of the waveform. Drag these to trim off the beginning or end of the recording. This is the quickest way to remove dead air or countdowns from the start, or trailing silence at the end.
 ## Select tool and Move tool
The detail view toolbar has two tools you can switch between:
**Move tool (V)** is the default. Use it to shift a track's position when you have two or more audio files in the same block (e.g., separate microphones for host and guest). This is how you align tracks that started recording at slightly different times.
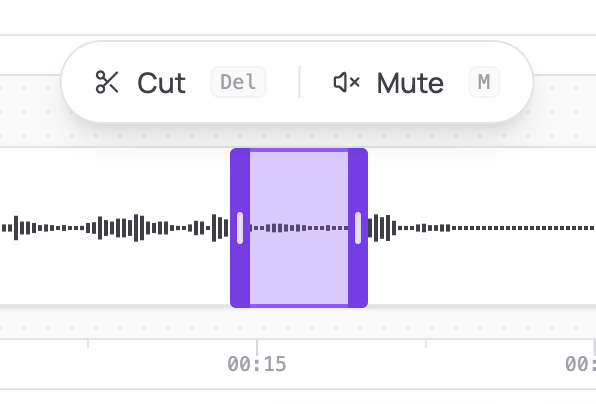
**Select tool (S)** is for making cuts and mutes. Switch to it, then click and drag on the waveform to select a region and click **Cut** or **Mute**.
## Making cuts and mutes
With the Select tool active:
1. Click and drag on the waveform to select a region
2. Click **Cut** or **Mute** (or use the keyboard shortcut)
3. The edit is applied immediately
A **cut** removes the selected audio from playback. The surrounding audio plays continuously with no gap. A **mute** silences the selected audio but preserves the duration (replaced with silence). You can undo any edit with Ctrl/Cmd+Z.
After selecting a region, you can drag the handles on either side to fine-tune the timing. Hit play (Space) to preview the audio inside the block while adjusting, so you can hear exactly where the edit lands. This works the same way when selecting words in the transcript.
## Select tool and Move tool
The detail view toolbar has two tools you can switch between:
**Move tool (V)** is the default. Use it to shift a track's position when you have two or more audio files in the same block (e.g., separate microphones for host and guest). This is how you align tracks that started recording at slightly different times.
**Select tool (S)** is for making cuts and mutes. Switch to it, then click and drag on the waveform to select a region and click **Cut** or **Mute**.
## Making cuts and mutes
With the Select tool active:
1. Click and drag on the waveform to select a region
2. Click **Cut** or **Mute** (or use the keyboard shortcut)
3. The edit is applied immediately
A **cut** removes the selected audio from playback. The surrounding audio plays continuously with no gap. A **mute** silences the selected audio but preserves the duration (replaced with silence). You can undo any edit with Ctrl/Cmd+Z.
After selecting a region, you can drag the handles on either side to fine-tune the timing. Hit play (Space) to preview the audio inside the block while adjusting, so you can hear exactly where the edit lands. This works the same way when selecting words in the transcript.
 ## Editing with the transcript
The transcript appears below the waveform in the same detail view. Transcription happens automatically after upload, so it's usually ready by the time you start editing.
To edit using the transcript:
1. Scroll down to the transcript below the waveform
2. Find what you want to remove
3. Select the words by clicking and dragging
4. Click **Cut** or **Mute**
5. The waveform updates to reflect your edit
## Editing with the transcript
The transcript appears below the waveform in the same detail view. Transcription happens automatically after upload, so it's usually ready by the time you start editing.
To edit using the transcript:
1. Scroll down to the transcript below the waveform
2. Find what you want to remove
3. Select the words by clicking and dragging
4. Click **Cut** or **Mute**
5. The waveform updates to reflect your edit
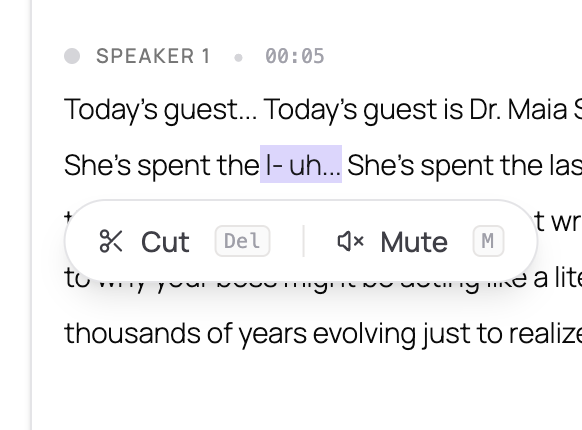 The transcript highlights edited regions so you can see what's been cut or muted.
Above the transcript text you'll also find:
* **Find Filler Words** scans the transcript for "um," "uh," "like," and other filler words so you can quickly locate and cut them one by one. Filler words are removed individually (not in batch) because each one needs slightly different timing to sound natural.
* **Search** lets you search for specific words or phrases in the transcript and jump to each occurrence.
When selecting text, the timing of the cut may be slightly off from the word boundary. Always play the audio to confirm the edit sounds right, and use the grab handles on the waveform to fine-tune if needed.
**Free plan limit:** Transcription has a lifetime usage quota. To check your remaining quota or learn about plan limits, see [Plans & Quotas](/account/plans-and-quotas).
## Waveform and transcript stay in sync
Edits sync bidirectionally:
* Cutting words in the transcript creates the corresponding cut on the waveform.
* Making a cut on the waveform highlights the affected words in the transcript.
You can switch between the two freely. Both views always show the same edits.
## Common issues
**The transcript has errors or inaccurate words**
AI transcription isn't perfect, especially with unusual names, technical jargon, or heavy accents. Small text inaccuracies don't affect the audio output. Focus on using the transcript to locate the parts you want to edit.
**My edits in the transcript aren't showing on the waveform (or vice versa)**
Try refreshing the page. Both views should always stay in sync.
**I accidentally made a cut. How do I undo?**
Use undo (Ctrl/Cmd+Z), or click directly on the cut or mute in the waveform or transcript to undo it.
**"Quota exceeded" error when trying to transcribe**
You've reached your plan's transcription limit. See [Plans & Quotas](/account/plans-and-quotas) for details on limits and upgrading. You can still edit using the waveform without a transcript.
## Related
* [Organizing Sections and Blocks](/editing/organizing): structure your episode before editing
* [AI Audio Enhancement](/editing/ai-enhancement): toggle enhancement per block
* [Adding Background Music](/editing/background-music): add music to sections
* [Plans & Quotas](/account/plans-and-quotas): transcription limits
The transcript highlights edited regions so you can see what's been cut or muted.
Above the transcript text you'll also find:
* **Find Filler Words** scans the transcript for "um," "uh," "like," and other filler words so you can quickly locate and cut them one by one. Filler words are removed individually (not in batch) because each one needs slightly different timing to sound natural.
* **Search** lets you search for specific words or phrases in the transcript and jump to each occurrence.
When selecting text, the timing of the cut may be slightly off from the word boundary. Always play the audio to confirm the edit sounds right, and use the grab handles on the waveform to fine-tune if needed.
**Free plan limit:** Transcription has a lifetime usage quota. To check your remaining quota or learn about plan limits, see [Plans & Quotas](/account/plans-and-quotas).
## Waveform and transcript stay in sync
Edits sync bidirectionally:
* Cutting words in the transcript creates the corresponding cut on the waveform.
* Making a cut on the waveform highlights the affected words in the transcript.
You can switch between the two freely. Both views always show the same edits.
## Common issues
**The transcript has errors or inaccurate words**
AI transcription isn't perfect, especially with unusual names, technical jargon, or heavy accents. Small text inaccuracies don't affect the audio output. Focus on using the transcript to locate the parts you want to edit.
**My edits in the transcript aren't showing on the waveform (or vice versa)**
Try refreshing the page. Both views should always stay in sync.
**I accidentally made a cut. How do I undo?**
Use undo (Ctrl/Cmd+Z), or click directly on the cut or mute in the waveform or transcript to undo it.
**"Quota exceeded" error when trying to transcribe**
You've reached your plan's transcription limit. See [Plans & Quotas](/account/plans-and-quotas) for details on limits and upgrading. You can still edit using the waveform without a transcript.
## Related
* [Organizing Sections and Blocks](/editing/organizing): structure your episode before editing
* [AI Audio Enhancement](/editing/ai-enhancement): toggle enhancement per block
* [Adding Background Music](/editing/background-music): add music to sections
* [Plans & Quotas](/account/plans-and-quotas): transcription limits